Over the past few weeks I've developed an obsession with side tables. You see, I needed one, and when I need a piece of furniture, I get crazoid trying to figure out how to make it.
And here's what I cannot figure out about the side tables in the stores. Why are they so short? I saw lots of cute ones at Target, and when you take one off the shelf and set it on the floor, you realize that it only comes halfway up your shins. And I loooove the martini tables at West Elm, but oh my goodness. I went into the store to see them, and they had them sitting on top of dining tables like they were cake stands. That's how tiny they are. I mean, there's low/sleek/modern, and then there's miniature.
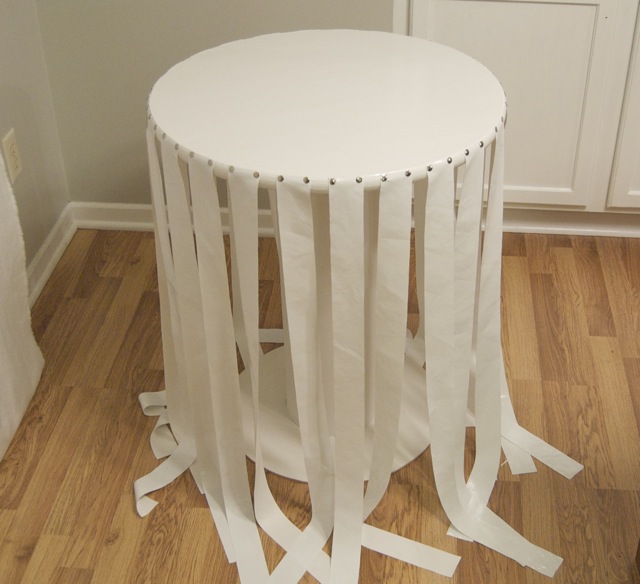
So I made one! I used a cardboard building tube from Lowes, two wood circles, and strips of shiny vinyl. Here's the skinny:
The cardboard tube comes in a 4 ft length. My local Lowes stocks the 8" and the 12" diameter, but I think the Sonotube website has a larger selection. I went with the 8" diameter. I cut a 27" piece. Yes, twenty seven inches tall! To cut the tube, first mark the tube, then cut sort of on a tangent. Remember geometry? I looooved geometry!
Once you've cut through the cardboard, you can insert the saw into the hole and cut around.
I used a keyhole saw that I got at Target for $7. This scrappy little saw has changed my life. I do everything with it, I swear. I cut the bottom circle with it, too. Rips right through 1/4" mdf.
I got my wood circle table top at Lowes, too. It was about $16, and it's 24" wide! Yay! I can put sooo many martinis on it! So back to work...place the cardboard tube on the tabletop and center it. Trace a circle. Screw bits of scap wood inside the circle.
Now stand up the tube and place the table top on it. Screw through the cardboard into the scap wood bits.
Attach the bottom the same way. I cut my bottom circle a little smaller than the top (18"). You can buy another circle (Lowes sells lots of sizes) but I cut mine from mdf I had on hand to save $.
Paint and polyurethane! I wanted the top super shiny so I used a high gloss polyurethane. The tube is just white primer, because it won't show very much.
While the paint dries, you can cut a million little strips of vinyl. Mine are 2" wide and 36" long. I didn't really cut a million. I cut 25. More geometry! Yay!
Tack the vinyl on like this. I spaced the strips an inch apart. I used regular thumbtacks, but you could get fancy and use upholstery nails.
Now wrap one strip around the middle like a belt and temporarily clip the edges of it together with a binder clip. Weave the long, hanging strips under the belt.
Pull each strip under the table so that they're smooth and tight and temporarily attach with tape until you figure out the spacing and tension you want. When you like the way it looks, you can replace the tape with staples. Also, remove the binder clip from the belt and secure it to the cardboard with tacks.
All done!
Total Cost
table top: $16
tube: $3
table bottom: free, leftover scrap from another project
vinyl: $4 (one yard with a 50% Joann coupon!)
tacks: $4
That's $27!!! And it's shiny and tall and I love it!


it's beautiful and ever so creative! I would never have thought you did all that with what you used!
ReplyDeleteSo so cool. I really and truly love it. AND: pretty sure I need one of those saws now:)
ReplyDeleteWow, I can't believe you came up with that! How clever! It looks great :)
ReplyDeleteXx Claire
www.jemimaandgeraldine.blogspot.com
Wonderful idea!
ReplyDeleteOk, that's just awesome. How resourceful are you?!
ReplyDeletewow thats amazing!
ReplyDeletenoossa achei linda essa mesa, Parabéns!!!
ReplyDeleteI too get obsessed with making something useful - I really wish I could get obsessed with something like working out instead, but it ain't happenin.
ReplyDeleteOops! Submitted the comment before I could say LOVE this table.
ReplyDeleteVery creative. I like this project. I never would have guessed that you made it from scratch. It's super cute. :)
ReplyDeleteGreat job. Very stylish, affordable and unique.
ReplyDeleteThat is the bomb! How did you ever thinki of using the vinal. This could fit into so many design schemes. Great job!
ReplyDeleteThat is a fantastic idea. I love when a god DIY plan comes together.
ReplyDeletewww.amberinteriordesign.blogspot.com
soooo, your blog is my new favorite thing! I came to look at your table tutorial, and then I was mesmerized and went through your old stuff too. I heart it all soooo much! I have a DIY blog too where I've compiled a huge list of DIY projects and tutorials, as soon as I recover from my sinus pressure headaches (the potato twist tie dinner, spot on) I'm going to feature you. Don't get too excited though, I think it still only has two followers. I think I'm gonna have to do a give-away to get more, lol. But then again, the sinuses and my fits of laziness have kept me from doing a lot this winter. I need some sun shine, so I can get out and start some projects.
ReplyDeleteSimply amazing. Another new blog friend.
ReplyDeleteFantastic DIY! Love it!
ReplyDeleteThis is seriously cute and it looks like something straight out of the West Elm catalog!
ReplyDeleteNow that the sidetables are finished, may I see the finished headbord? lol
ReplyDeleteGreat job, inspiring.
Wow what a wonderful table and such humble beginnings.
ReplyDeleteOn a side note, where are your curtains from? they are lovely
Did you ever find out where her curtains came from. I love them!
Deletekrisss10, there's a link at the very bottom of this page to KATIE, believe it takes you to her blog. You should be able to contact her that way. Ditto for you, Catriona.
Deletehttp://matsutakeblog.blogspot.com/
is there a mensa of craft?
ReplyDeleteincredibly crafty and modern....I bow to your awesomeness!
ReplyDeleteSo cool, I actually picked this one out as my favorite in the group. I had no idea it was crafted. I was looking to see who sells it...lol. I am going to Lowes, wish me luck!! Sandee
ReplyDeleteSo
ReplyDeleteDamn
Cool
I
Could
Slap
My
Momma!
Great job and it looks pretty easy to duplicate!!
This is incredible!!
ReplyDeleteLove this table....may i ask how you cut the vinyl strips so evenly?
ReplyDeleteSo great! I have been looking for a cheap table for my bedroom to put with a couple chairs. I have been inspired (:
ReplyDeleteIf my husband likes this when he comes home, I'm totally making this!
ReplyDeleteI just discovered your blog tonight...I think I am in love...
ReplyDelete--Jaclyn T
Silver Twig Necklace GIVEAWAY @ my blog:
http://positiveponderings.blogspot.com/2011/09/necklace-giveaway.html
Cool!!!
ReplyDeleteFabulous!....Did I read that right that you only used one yard of vinyl?
ReplyDeleteThanks for the awesome idea, I made one a brown one that we keep by the front door. (you're so right about all tables being short now)
ReplyDeletehttps://picasaweb.google.com/104739659633656775240/Downloads?authkey=Gv1sRgCLn1muq_u-ueaQ#5771447490014639026
think you could use a pvc pipe instead?
ReplyDeleteOr those tubes that you can get for free from the newspaper place
ReplyDeleteOh gosh. So happy I found this. I've been searching for a pair of nightstands and can't find anything I like that's inexpensive. Plus, our bed is outrageously high off the ground like you were mentioning. This will be my new project and I can't wait to try it out! Thanks so much for sharing the tutorial. :) I'll share how it goes at abetterbestlife.blogspot.com
ReplyDeleteI love seeing what people come up with when they build their own. That bedside table is truly lovely.
ReplyDeleteWhere did you find the vinyl?
ReplyDelete